Landscape Photography Composition Rules

Rocking-Chair-HD-FrameW Landscape Photography Composition Rules

1. Rule of Thirds – The rule of thirds is one of the most basic and most important rules in photography and one of the first taught in photography classes.  You can read more about it on my blog post located at:  http://clcrowphotography.com/rule-thirds/

2. Framing an Image – add points of interest in foreground.  For example, this rocking chairs in this photograph are framed by the front of the house and the porch supports.  Another example is taking a photo of the Jefferson Memorial on the opposite side of the Tidal basin framed surrounded by cherry blossoms in the spring.
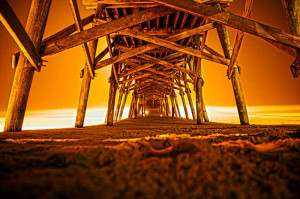
Fire Pier3.  Diagonal Lines – Using a diagonal line can be a very effective way to draw the eye to the main focal point.  Two converging lines coming to a single point can also be even more effective.  (I.e. Using a river or a road that leads up to a Mountain or bridge)

4. Geometric Shapes – The easiest example of this is if you have 3 different subjects.  Position them in such a way that they create a triangle.

Rule of Thirds

 The Rules of Composition – Rule of Thirds

The rule of thirds is one of the most basic and most important rules in photography and one of the first taught in photography classes.

Using the rule of thirds you break down an image into three parts, both horizontally and vertically.  When looking through the viewfinder of your camera, you visualize a tic tac toe board.

Place your subject where the horizontal and vertical lines intersect. See in the photograph above how the eagle’s eye is almost perfectly placed.   The idea is to give your photograph more balance.  Studies show that the intersecting lines is where people’s eyes usually go when looking at a photograph or a piece of art.  It is the natural way of viewing an image.

Just like most rules, there are exceptions.

  • If your subject takes up most of the photograph, like a flower, you don’t need to use the rule.

You can also crop the photo using photo editing software (i.e. Photoshop).

  • This is especially helpful when taking photos of wildlife.  They don’t usually stand still for very long so you don’t always have time to perfectly position your subject.

Real Estate Agent Photo Tips

Real Estate Agent Photo Tips


 Is this the way you would like your house to look?

I have done work with our local Realtors and also have seen what a lot of Realtors are using to show off their listings. One of my biggest complaints is how AWFUL a number of pictures are on our local MLS. So here are some tips that I would like to share with you. The following is the advice I would like to share with you:

• Make sure that the room you are photographing is well lit either by making sure there is enough natural light or by turning on the interior lights no matter the time of day

• Try to use a tripod or set-up the camera on a table or a chair

• Try to get as much of the room as possible in the picture – stand in the corner, have the zoom at the lowest setting

• When taking a photograph of the outside of the house – DO NOT stand directly in front of the house. Stand off to one side instead. Pick the side that has the least amount of items (i.e. trees) blocking the house. Kneel down as low as you can – this will make the house look appear bigger

• Make sure that the lawn has been mowed recently

• There should be no cars in the driveway and make certain the garage door is closed

• Be aware where the sun is as you don’t want to have it behind the house or your photo will be too dark

• The main rooms that you want to photograph are the living room, bedrooms, kitchen, dining room, foyer and front and back porch

• Make sure your pictures are clear – a blurry picture is well, blurry. What is the point of even having a picture if no one can’t see what it is – it makes your reader squint and wonder if he/she needs glasses and serves absolutely no purpose

Or would you rather have your house look like this?