Day In The Life Series – Editing Images

Editing ImagesFirst we had Deciding What to Shoot and then Shooting the Images.  Now we are getting to the fun part, Editing Images.  

After shooting, first thing I do when I get home, is open up Adobe LightRoom (LR). I’m not real imaginative on naming the folders.  Surfside Pier is in a folder surprisingly named Surfside Pier. These photos were put in the Myrtle Beach Areas Folder.  LR creates a subfolder labeled 2014 and then a subfolder inside with the days date.  I keep the unedited images in the date folder and save the edited images to the 2014 folder with new name.  For naming images I use abbreviations of what it is or what folder it is, followed by two digit month, four digit year and then they are numbered chronologically.  For instance, this HDR batch is in the Myrtle Beach Folder and February images so they are MBHD-02-2014-001.  For those photos I use on my social media sites, I just take out the dashes.

Once all the images are uploaded, I start editing them. After picking three images, I open them up in HDR Pro in Photoshop.  I would love to use Photomatrix Pro 5 but its not in the budget for the moment so I use what I have.   After playing with all the settings to get the photo where I like it I hit OK and I’m back to regular Photoshop commands.  I then will tweak the levels, possibly the color balance.  The last thing I do before saving the image is Unsharp Mask. 

Now that the full size image is saved, I resize it down to 7×5, 100 dpi, add a border and drop shadow and add my logo underneath. I then flatten the image so all the layers are gone and save it with the same file name as the large file but without the dashes so I quickly tell them apart.  

Often times after creating the first image, I will go back to Image-Adjustments-HDR Toning and tweak the settings again to get the image to really pop.  When saving these images, I use the same image name except I add a letter (i.e. MBHD-02-2014-001a).

This three part series is just Day in the Life of a Landscape Photographer.  Later this year when we get closer to summer, I will be writing the Day in the Life of the Beach Portrait photographer which is quite a bit different than this series.

Follow me on the following social media sites to find out when I have a new blog post:

Facebook
Google+
Pinterest
Twitter

Day in the Life Series – Shooting The Images

Shooting the ImagesContinuing on from my last post Deciding What To Shoot, I will now go into what it takes Shooting the Images.  

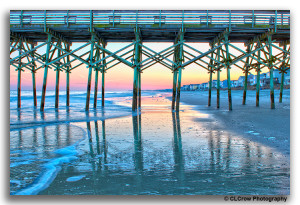
I arrived at Garden City Pier about 30 minutes before sunset.  Since I have shot so many pier shots I was thinking of what I could do that was different.  One way is to get the pier at different angles like the photo on the left.  This was taking underneath just looking up As I stated in my last post, all these images are HDR images.  

I always shoot raw.  I almost always shoot manual so I control the aperture and shutter speed.  Something that might surprise some, I do normally shoot autofocus because I don’t trust my eyes to make sure something is in absolute focus.  The camera does a much better job than I can.  It also is because I tore my last contact lens and I haven’t gone for my eye exam and shooting with glasses on is not fun. I’m getting my eyes examined on Thursday and will be going back to contacts…..YAY!!!!!!

The problem with shooting the sunset on the east coast is that it sets over land so you don’t get the dramatic sun over the water shot. I was constantly looking for a new angle to shoot that I could get at least some of the pier but also the beautiful pastel colors of the sky.  

I was bracketing three shots and then slighting change the settings and bracket three more shots so I would have an assortment to choose from when I got home.  It gives me options but it fills up the memory card rather quickly.  Luckily my memory card is 16GB.  MBHD022014013

With all my shoots, I’m always looking for something different to set my photography apart from all the other photographers out there.  Sometimes that is in the subject, the angle I shoot the subject or also in the way the photo(s) are edited.

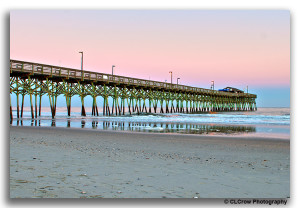
As you can see on the photo on the right, I still captured part of the pier but caught the colors of the sunset both in the sky but also reflecting at the water on the beach.

The settings for the two photographs are:
     Underneath Pier:           Shutter Speed: 1/20th;   Aperture: f/7.1;  Focal Length: 32mm;     ISO 200
     Sunset Reflection:         Shutter Speed: 1/50th;   Aperture: f/9;     Focal Length:  24mm;     ISO 200

The last blog post will be Editing the Images and should be out by the end of the week.  


Day in the Life Series – Deciding What To Shoot

 Deciding What To ShootDeciding what to shoot and where to shoot is always the first thing to do when I’m shooting landscape.  Yesterday I decided to shoot the sunset at Garden City Pier. Even with all the pier photos that I shot, this was only my second time shooting at Garden City.  Most of my pier shots are Surfside Pier which is a few miles up the road.  Garden City is a bigger pier but less parking and in the summer, its really hard to find good parking. This time of year you get your choice of spaces.  I normally shoot sunrise photos at piers since the sun rises over the ocean.  It should be noted that I haven’t shot sunrise shots at Garden City.  My other shots were about 20 minutes before a severe storm a few weeks ago during mid day.  

I would say the main reason I decided to shoot Garden City instead of Surfside was as I was getting ready to leave, I was talking to my mother.  When I told her that I was heading out to shoot the sunset, her response was "you are not planning on shooting the pier again, are you?"  Okay then, change of plans.  Granted I still shot a pier.   I got in my car and decided to shoot Garden City Pier since I had only shot it once before.  Taking my trusty Nikon D90 camera along with my 24-70mm and 70-300mm lenses, knowing full well that I would probably only shoot with my new lens.  The newness of the lens hasn’t worn off yet and really don’t need a longer zoom lens when shooting the pier since I parked near it.

Just like most of my more recent shoots, this one was HDR photography as well.  For those who don’t know what HDR Photography is, HDR stands for High Dynamic Range. Its usually 3 or more images.  As per wikipedia, "In photography, dynamic range is measure in EV differences (known as stops) between the brightest and the darkest part of the image that show detail.  An increase of one EV or one stop in doubling of the amount of line.  High-dynamic-range photographs are generally achieved by capturing multiple stand photographs, often using exposure bracketing, and then merging them into HDR image."  This is exactly what I did. Setting my camera up on a tripod because the images have to be the exact same image.  My camera was set to bracket so that one photo was at normal exposure, one was one stop lower and the other was one stop higher. I’ll get to what to do with the images in my Editing the Images post.

The one complaint I have of shooting on the beach is the amount sound you get into your shoes and all over your stuff.  

The next blog post will be Shooting the Images and should be out in the next couple days.